The following checklist will walk you through the step-by-step process of implementing and configuring the ToxPDX 2.0 application. ToxPDX 2.0 is required to utilize the Micromedex® Online Web Service with your toxiCALL® installation.
SPECIAL NOTE: Steps 2 – 9 will need to be performed at each toxiCALL® workstation.
•STEP 1: Download the latest ToxPDX 2.0 software from the toxiCALL® Discussion Forums Downloads page.
o Please note a forums account is required for access.
o http://forums.toxicall.com/forum47-toxicall--toxitrack-downloads.aspx
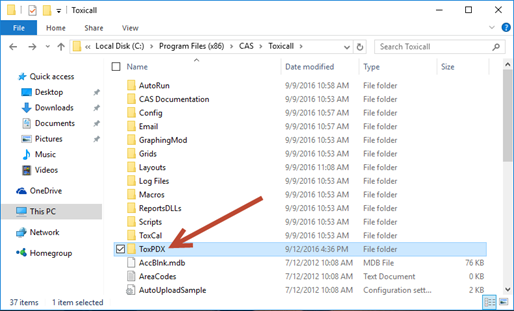
•STEP 2: Locate and open the “ToxPDX” folder directory of your toxiCALL® installation directory.
o The default path to the “ToxPDX” directory is “C:\Program Files (x86)\CAS\Toxicall\ToxPDX”.


•STEP 3: Backup Existing Files
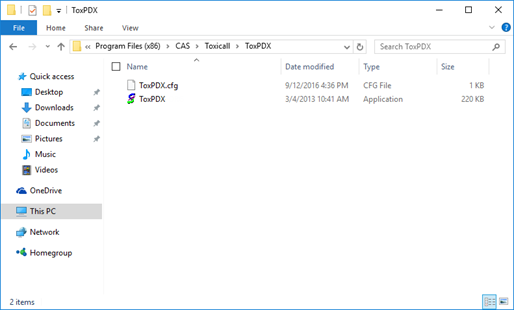
o We advise creating a backup copy of the existing ToxPDX v1.0 executable (“ToxPDX.exe) in the event you ever need to roll-back your ToxPDX v2.0 implementation. You can do this by either re-naming the existing executable or creating a copy in a secure location.
§ Note: You may not see a “ToxPDX.cfg” file in your “ToxPDX” folder. This is normal as the file is created when ToxPDX is launched for the first time. Please proceed with the ToxPDX 2.0 implementation process as normal.
•STEP 4: Place ToxPDX 2.0 Files
o Extract the ToxPDX 2.0 .ZIP package downloaded in step one and copy the following files into your “ToxPDX” directory location. If prompted to replace the existing “ToxPDX.exe” file, please select to replace the existing file with the newer v2.0 executable provided.
§ ToxPDX.exe
§ CASCO.dll
•STEP 5: Launch the ToxPDX 2.0 Configuration
o Log into toxiCALL® with Supervisor or Configuration Manager rights.
o Select “Tools” > “Configuration…”
o Press the “More…” button to show workstation configuration options
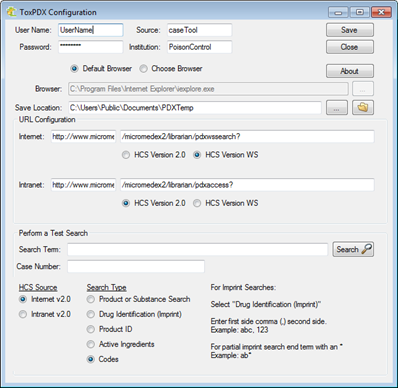
o Locate and select the “Configure ToxPDX” button in the lower left corner of the “toxiCALL® More Configuration” window. The ToxPDX Configuration window should appear as shown in the following image.

•STEP 6: Enter the Micromedex® provided Username and Password (The user name and password is provided by Micromedex® support, not CAS.)
o Based on client feedback we have learned trusted authentication (where no user name or password is required) does not appear to be supported by Micromdex® when utilizing the online web service.
o If you currently use trusted authentication to access Micromedex®, you will likely need to reach out to Micromedex® directly for a user name and password before proceeding.
o SPECIAL NOTE: If you are also planning to utilize the Micromedex® InTRAnet Web Service you will need to create an account within your InTRAnet installation utilizing the same user name and password provided to you by Micromedex® support. Please review the information contained in the following linked toxiCALL® Discussion Forums Post.
§ InTRAnet Installation Considerations: http://forums.toxicall.com/topic202-micromedex-intranet-installation-considerations.aspx
•STEP 7: Adjust the “Browser” setting as needed. ToxPDX 2.0 supports the ability to have the browser of your choice utilized when performing searches.
•STEP 8: Locate the “Internet” URL settings and ensure the “HCS Version WS” (Web Service) radio button option is selected. The “HCS Version 2.0” option is for the older Micromedex® online service and should not be used unless you have a specific reason.
o If you are performing an InTRAnet installation of Micromedex®, please be sure to update the “InTRAnet” URL option to “HCS Version WS” as well.
•STEP 9: Perform a test search.
o Locate the “Perform a Test Search” area and ensure the following:
§ HCS Source is set to “Internet v2.0” or if you are performing the test on your InTRAnet installation, you select “InTRAnet v2.0”.
§ Search Type is “Product or Substance Search” to search for a standard product such as “Aspirin”
o Enter a search term into the “Search Term” field. You can ignore “Case Number” as this is a future field / feature.
o Press “Enter” or “Search” to perform the search.
o You should see the configured browser window appear along with the ToxPDX “Push to toxiCALL®” window appear.
o In the list of results, you should see a list of products with a small blue download icon to the left of each product. If not, please ensure the URL configuration is set to “HCS Version WS” and try again.
o Select the download icon for one of the products shown and you should see a confirmation pop-up appear at the top of the web page indicating the product has been selected for download.
o Swipe your mouse cursor over the “Push to toxiCALL®” button and you should see the product selected appear as the result.
For more information in regards to configuring ToxPDX 2.0 and performing a test search, please reference the following links.
ToxPDX 2.0 is now implemented and ready for use.