The “Send ToxiTrack® Encrypted File via Network” option allows a user to send encrypted case files via a direct network connection to any desired location. The case files are placed into a 256-bit encrypted .zip file that is also password protected to add an additional layer of security. Please follow the steps listed below to configure your AutoUpload Manager to utilize this feature.
Ø Start TOXICALL® and log in with supervisor rights.
Ø Click the TOOLS menu option and select the “AutoUpload Manager” option.
Ø In the “AutoUpload Section” field type in a unique name for the upload process. An example may look like “Network Send” if you are sending the case data to a shared network location.
Ø Once you have a name typed in, press the “Create a New AutoUpload Configuration” icon to the right of the field.
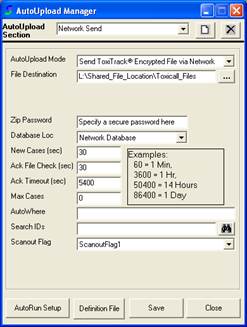
Ø Using the “AutoUpload Mode” drop down menu, select the “Send ToxiTrack® Encrypted File via Network” option.
Ø The “File Destination” field is where the user will specify the shared network location they would like to send the encrypted .zip files to. If you are unsure what to type into this field, contact the party that will be receiving the data to confirm the proper shared network location to send the case data to.
Ø The “Zip Password” filed is where the password that will be placed upon the .zip files that will be sent out will be specified. When the poison center sends these .zip files they are password protected for security purposes. Please enter a secure password into this field. The recipient will also need to be informed of this password to access these files.
Ø The “New Cases (sec)” field is where the user will specify the frequency that the upload process will check for new cases. Typically this setting is set at a value of 30. This is the time in seconds.
Ø The “Ack File Check (sec)” field is not used in the “Send ToxiTrack® Encrypted File via Network” upload process. The “Ack File Check (sec)” field should be left blank.
Ø The “Ack Timeout (sec)” field is not used in the “Send ToxiTrack® Encrypted File via Network” upload process. The “Ack File Check (sec)” field should be left blank.
Ø The “Max Cases” field is where the user will specify the maximum amount of cases to be sent at a time.
Ø The “AutoWhere” statement is a user defined addition to the system generated Where clause. Note: The user should not include the "Where" in this statement as it will be appended to the existing Where statement.
Ø The “Search IDs” field is where the user will specify any custom saved searches that they would like the AutoUpload process to use when locating cases to upload using the “NIOSH Send Cases” function. For example if the user had a custom saved search that filtered out all cases that were a fatality and they wanted to send only these cases over the “NIOSH Send Cases” process, the user could specify that custom search in this field.
Ø The “Scanout Flag” drop down menu field is where the user will specify the scan out flag they would like to place on the case that is uploaded through this process so that it is not uploaded more than once. For example if the user has an upload process sending cases to the AAPCC and to the NIOSH facility, the user would want to set the AAPCC scan out flag to ScanoutFlag1 and the NIOSH process would have the scan out flag set to ScanoutFlag2. Setting a unique scan out flag for each process is an essential part of configuring the AutoUpload process to properly handle which cases have been sent to which location.
Ø Once you have completed filling in the fields that are needed you will need to set the process you just created to be an active running process. Currently it is not yet set to run when you start AutoUpload. Please reference the section header labeled “Setting an AutoUpload Process to run” before proceeding.
Ø Press the save button to save your changes.
Ø Exit “AutoUpload Manager” and TOXICALL®.
Ø Please refer to “AutoUpload Shortcut Configuration” to set up the proper application shortcut parameters to start the AutoUpload process.
Once you have the AutoUpload Manager configuration complete, and have created an AutoUpload shortcut, you are ready to start sending cases to the destination shared network location. To start the upload process, double click on the AutoUpload shortcut.