The SearchDataLoc table allows supervisors to create new
databases, which can be used for archiving to aid in database management. These
databases can also be used as destination databases to copy cases into, as well
as for sharing cases with other centers running TOXICALL® for research.
View levels can be set for each database to control access by users. For
more information see the section View Levels-Assigning Rights.
Supervisors can create new archive databases, assign
rights, and change the location of the newly created database. Creating a
new archive file involves declaring a name for the dropdown to display from
within TOXICALL®, pointing the database to the file location, setting the
appropriate View Levels and copying system tables.
After opening a new entry screen in the SearchDataLoc
system table, you will want to define a name for the new archive that will
appear in the Location dropdown box in the Search window of TOXICALL®. This name
can contain spaces and most characters as necessary.
Next select the View Levels that will be able to access
this archive file. The appropriate levels to select depends on your site’s
restrictions to archive files and also on your View Level scheme that you have
established.
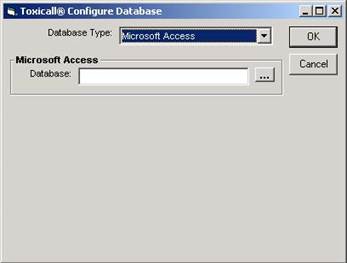
Next, click the Lookup button  next to the File field. The next
screen is shown below. If you are using an Access network database, you
will choose Microsoft Access as your database type. If you are using SQL,
you can choose either Microsoft Access or SQL Server as your database type. If
you choose SQL, be sure that your SQL Administrator has set up the database for
you. You will need to know the name of the SQL Server it is on, the name
of the database, login and password. For more information, refer to the
SQL Server Setup documentation. This document will follow the path of creating
an archive in Access.
next to the File field. The next
screen is shown below. If you are using an Access network database, you
will choose Microsoft Access as your database type. If you are using SQL,
you can choose either Microsoft Access or SQL Server as your database type. If
you choose SQL, be sure that your SQL Administrator has set up the database for
you. You will need to know the name of the SQL Server it is on, the name
of the database, login and password. For more information, refer to the
SQL Server Setup documentation. This document will follow the path of creating
an archive in Access.
Click the Lookup button next to the File field again. This
will open a browse window, from which you will need to browse to your desired
directory. Make sure this file is in a location where everyone who will have
access to it will be able to reach it. A UNC path or drive letter mapping
can be used to connect the database with the workstations. When you are in
the correct directory, type a filename for the database in the Name field at the
bottom. This will be the actual file’s name and therefore should not contain
spaces or other reserved symbols. When done, click the OK or Save button.
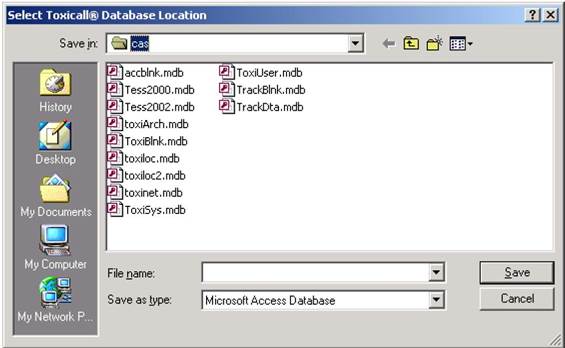
This will take you back to the previous window.
Click OK. This will open a message box similar to the one below. Click
Yes.
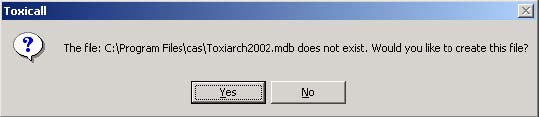
It will pop up a warning message reminding you to copy
system tables so that data will resolve. Click OK. When it brings
you back to this screen you are ready to save the file and close as described in
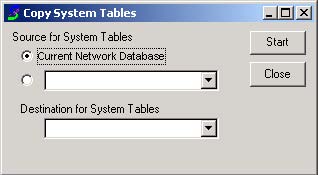
the Adding New Entries section. When you have reopened TOXICALL®, go to
the Tools menu and select Copy System Tables. The window will ask you for the
source and destination databases. The source should be set as your network
database and the destination as your new archive database (which should now be
visible in the dropdown). Click Start and then OK in the message box that
alerts you that this action cannot be aborted once started. A series of windows
stating that they are transferring system information will be displayed. When
complete, it will give a new message box that TOXICALL® will now exit.
Upon restarting TOXICALL®, the archive file is ready to use.
This step is necessary to copy information from your
network database over to the new database such as SPI Names and numbers and
other customized fields. If this step does not occur, you will see fields with
<xx Not Resolved> as the contents instead of the proper value. You will
also need to copy the system tables to all databases whenever you make changes
to them, such as adding a new SPI or a new health care facility in order for
those additions to be visible.