
The “Report Detail” area where the user will define the following:
Ø Seq. Number: The Seq. Number field determines the order in which the reports will be processed when the batch runs. We suggest incrementing this number in 10’s (i.e. 10, 20, 30, 40, etc.)
Ø View/Report: The “View/Report” field is where the user will define the view or report to be processes when the batch runs. Examples are “Case Detail Report”, “003 Rpt AAPCC – Month by Call Type”, etc.
Ø Search Name: The “Search Name” field is where the user will define which search criteria to use when processing the report specified. The user can select either a system search, or a saved custom search already created.
8. In the following image, you can see we have specified the “View / Report” as “Case Detail Report” and the “Search Name” (previously created) as “Carbon Monoxide Cases”.
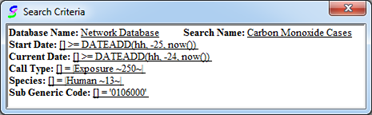
Previously Created Search Criteria

Report Detail Area Populated with Report Name and Search Name
9. Next the output option needs to be defined. For further information on each output option available is please reference the “Output Options” section of this document.
10. The first output option well is set as a PDF file with a file name of “Carbon Monoxide Cases” as shown in the following screen shot.
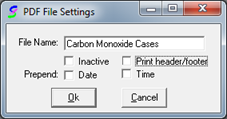
Seq 10 PDF File Settings
11. Press “Ok” to save the “PDF File Settings”.
12. Back at the “Batch Reporting Setup” window press the “Trigger Lists” button to assign a trigger list to the batch. In this scenario, we want to assign the “Stop Processing Carbon Monoxide Cases” trigger list first so that if no cases are found, the batch does NOT continue.
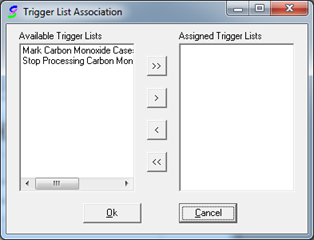
Seq 10 Trigger List Association Window
13. Select the “Stop Processing Carbon Monoxide Cases” trigger list, and use the singe right arrow button to move your selection to the “Assigned Trigger Lists” area.
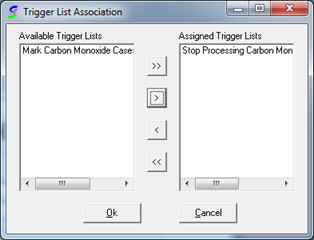
Seq 10 “Stop Processing Carbon Monoxide Cases” Trigger List Assigned
14. Press “Ok” to save the changes and return to the “Batch Reporting Setup” window.
15. Check the “Triggers Only” check box to set the sequence number to always evaluate the trigger list assigned.

Seq 10 “Triggers Only” check box selected
16. Press the “Save” icon to save the changes. Then press the “List” icon to return to the “Carbon Monoxide Reports” batch reporting setup screen.
17. Press the “New” icon to create a new report entry (Seq 20). This will be the entry that actually generates and emails the report if the “Stop Processing Carbon Monoxide Cases” trigger does not fire (one or more cases were found on the network).
18. Set the “View / Report” field to “Case Detail Report”.
19. Set the “Search Name” field to “Carbon Monoxide Cases”
20. Select the PDF “E-mail” output option. The “PDF E-mail Settings” window will automatically appear. Fill in the fields as desired. The following image shows how the fields have been filled in for this scenario. Notice a subject, message body, and file attachment name fields have been populated. Also, “Thompson, James” has been specified as the E-mail recipient.
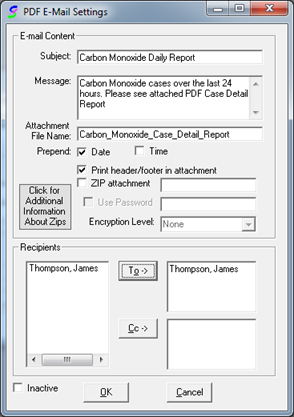
PDF E-mail Settings Populated
21. Press “OK” to save the changes.
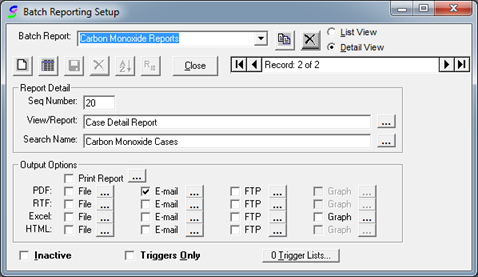
Seq 20 Completed with E-mail Output Selected
22. Press the “Save” icon to save Seq 20 then press the “List” icon to return to the “Carbon Monoxide Reports” setup screen.
23. Press the “New” icon to create a new entry (Seq 30).

Seq 30 Created
24. Select “Case Detail Report” for the “View / Report” field.
25. Select “Carbon Monoxide Cases” for the “Search Name” field.
26. Check the PDF “File” output option and type “Carbon Monoxide Cases” for the file name.
27. Press the “Trigger Lists…” button and assign the “Mark Carbon Monoxide Cases” trigger list.
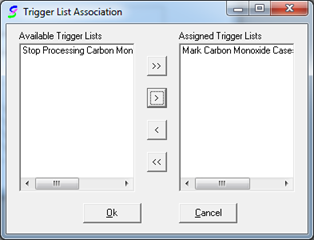
Mark Carbon Monoxide Cases Trigger List Assigned
28. Check the “Triggers Only” check box and save the changes.
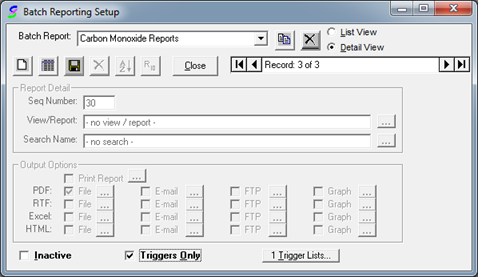
Seq 30 Entry Completed
29. The batch reporting setup is now complete. Press the “X” to close the window.
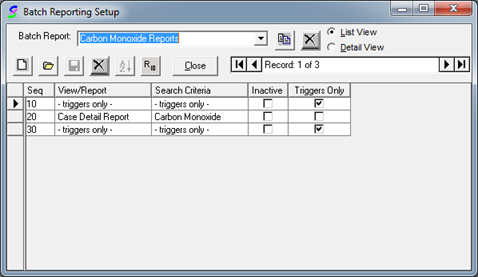
Carbon Monoxide Cases Batch Reporting Setup Complete
Once the Batch Reporting Setup is complete, the next steps will be to set the batch queue to run at a specified time and duration.