The “Receive Toxitrack® Encrypted File via Network” option is for TOXITRACK® users that are on the same network as the poison center they are receiving case data from. This functionality allows the TOXITRACK® user to configure their AutoReceive to directly connect to the same folder location as the poison center is using to place case data.
Once TOXITRACK® is started and logged into with supervisor rights, please follow these steps to complete the AutoReceive configuration.
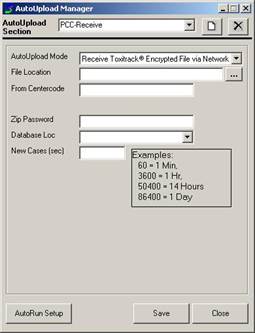
1. Click the TOOLS menu option and select the “AutoUpload Manager” option.
2. In the “AutoUpload Section” field type in a unique name for the receive process. An example may look like “PCC-Receive”.
3. Once you have a name typed in, press the “Create a New AutoUpload Configuration” icon to the right of the field.
4. Using the “AutoUpload Mode” drop down menu, select the “Receive Toxitrack® Encrypted File via Network” option.
5. The “File Location” field is where you will specify the folder location where the data is being placed on the network. Contact your IT department if you are unsure of the exact path you need. If the workstation has the folder location mapped already you can use the 3-dot lookup button to open a file browsing window to select the path manually.
6. In the “From Centercode” field please specify the center code of the Poison Center that you are receiving files from. This number will need to be in a three digit format. An example would be “012”. If you are not sure what the poison center code is, please contact the poison center for that information.
7. The “Zip Password” field will need to contain the .zip file password to access the data files sent from the poison center. When the poison center sends case data in .zip files they are password protected for security purposes. Please contact the poison center for this password if you are unsure of what to type into this field.
8. The “Database Loc” dropdown field is where the user will specify where the case information after being processed will be placed. Typically the user will select “Network Database”.
9. The “New Cases (sec)” field will specify the frequency that the receive process will check for new cases. Typically this setting is set at a value of 30.
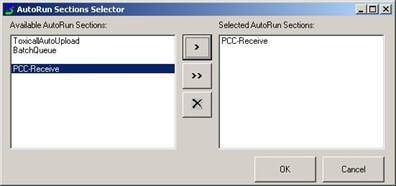
10. Next press the “AutoRun Setup” button to bring up the “AutoRun Sections Selector” window. Select the section that was just created from the “Available AutoRun Sections” list on the left and press the singe move arrow to move it to the “Selected AutoRun Sections” list. Press the “OK” button to save and close the window.
11. Press the save button on the “AutoUpload Manager” window to save your changes.
12. Exit “AutoUpload Manager” and TOXITRACK®.
13. Please refer to “AutoReceive Shortcut Configuration” to set up the proper application shortcut parameters to start the AutoReceive process.